Serving the Gainesville and Hawthorne Florida Area


Return to the Econofix Home Page
Auto Truck Wire Harness Repairs
Wiring Harness Repair
Wire diagrams are getting bigger!
In case you haven't noticed, cars and trucks have a lot of wires running through them nowadays! I have files of wiring diagrams for cars I've fixed over the years. The 1970's cars had diagrams that fit on 2 pages. By 2000 a wire diagram on a Cadillac or high end import was twelve pages or more. The diagrams are mostly online now, but they're either incomplete, or huge.
Often wires get damaged in cars, since they run almost everywhere.
Common causes of wire failures
Collisions and bad body repairs
Since wiring harnesses run inside and through body panels they can be damaged in a collision. Sometimes this isn't obvious because the damaged wire is inside a body panel. A wire can be dislocated in a collision so that it rubs against a sharp piece of sheet metal. It will work for awhile after the collision, but eventually the insulation will wear through and short or ground out.
Even when wires aren't damaged by the collision, body repairmen aren't always expert electrical repair people. Often body shop people will cut a wire harness when there's a connector a few inches away that they could have just unplugged! I've seen taillight wires cut and then just twisted back together and wrapped with masking tape after just a regular overall paint job!
Stereo and accessory installations
Many installers get paid about $25 to put in a complete system. The very best free stereo installations only meet my bare minimum wiring standards, and the worst ones are my number one source of under dash repairs. Installing a stereo can be difficult based on the vehicle, and if possible, it should be done by an experienced professional.
Trailer light harnesses
Besides tending to dangle down and get ripped off by road hazards, trailer wiring harnesses once again are most often done at best to my minimum standard. At worst: the number one cause of tail light and brake light failure (on vehicles that have trailer wiring, that is)
Water in connectors
Electricity and water don't mix! If wiring connectors get wet they can corrode and fail. This can happen from rusted out body panels, or body panels whose water drain holes have been plugged by leaves and other debris. Spilling a drink or coffee on your console, or leaving the windows down in the rain can also soak some wiring. Convertibles and "T" tops, along with "Sun or Moon" roofs are notorious for leaking, and destroying electric wiring in the process. Trunk seals can leak and cause tail light problems.
Improper wire routing
Improperly routed wires can be from a careless mechanical or body repair, but quite often the improper routing is from the factory! When ever I've been baffled by an intermittent electric problem on a vehicle it's been because of a wiring harness rubbing against a sharp edge on a body panel or motor part and grounding out sometimes.
Bad Connector, ground, splice, or junction
Unless the wiring harness is damaged, most of the time a wire failure is not inside the wiring harness. Usually the failure is in one of the connectors that connect the harness to components or another harness. Sometimes the electric terminal will not latch into the plastic connector tightly and shove back a bit when connected at the factory. In this case the wire will work for awhile, then fail, or start making intermittent contact. Sometimes it can get hot, melting the plastic connector. Ground wires are crucial, especially for computer components. Many ground wires bolt to the engine, and sometimes mechanics will forget to re-connect the ground wire after doing a repair. Some ground wires go to a sheet metal screw on the body, which can loosen up or corrode, causing a bad ground.
A VERY common ground fault
(Note to pro techs: this is on the ASE test!)
A very common ground fault occurs in tail lights. The symptom: both tail lights work, but one is slightly dimmer than the other. When the brake is applied, one brake light comes on, but the dim tail light side goes out completely: no light at all! When the brakes are released the tail lights return to "normal", but one is slightly dimmer than the other.
This is caused by a bad ground to the tail light bulb socket. The tail light / brake light bulb has 2 filaments in one bulb: a small filament (tail light) and a larger and brighter filament for the brake light. On some domestic vehicles and trailers the larger, brighter element does the turn signal also. When the bulb has a bad ground the smaller filament will get a ground through the larger filament until the large filament is powered up. Then the small filament will go out, because it has positive current to both sides. This is not always a wire problem: sometimes the bulb base or bulb socket itself can be corroded and not making a good connection. A rolled up piece of sandpaper can clean the socket, and sandpaper can clean the bulb base too.
Wire insulation failure or short
Bad insulation on a wire is an electric problem is waiting to happen. When the insulation is damaged, a wire can short to ground or to another wire, causing all sorts of problems.
Common causes of insulation damage
The plastic insulation on auto and truck wiring can be damaged in many ways. Heat and age by themselves can eventually destroy plastic wire insulation. Oil, brake fluid, and transmisision fluid exposure can accelerate insulation damage. In the mid 1980's and again in the mid 1990's Ford bought some bad wire that failed a lot sooner than it should, especially if exposed to some oil leaks and heat. I've seen some Ford engine wiring harnesses where all the insulation has crumbled off: just bare wires hanging all over the place.
I've also seen rough welds and frame areas with wiring harnesses improperly routed over them. After a few years the rough edge eats through the wire and grounds it out. In these cases the wire may not ground out all the time. This can lead to some weird problems, like "I hit a bump and the engine shuts off"
Wire Repair
There are several ways to repair car and truck wiring harnesses. These are listed in order of quality: the first few are just for emergencies, the last is as good or better than the factory wiring.
Twist and tape
If you get a free stereo install you'll probably get a twist and tape wiring job. The wires are stripped, twisted together, and taped with electric tape. This can work for low voltage connections, but it also can come loose and fail quite easily. The only time I'll use electric tape on a wiring harness is when the harness has rubbed against something sharp and grounded out a wire, but the wire isn't badly damaged, just "skinned" a bit. Since I will be relocating the wire away from the sharp surface I will often tape up the harness if all of the wires are still intact. Sometimes I'll wrap an old section of radiator hose around the harness to furher protect it from damage. I NEVER MAKE A SPLICE OR REPAIR USING THE TWIST AND TAPE METHOD! Of course if you're out in the woods or on the side of the road a twist and tape repair can get you home where you can fix it properly!
Scotchlock connectors
These are often used to "tap in" to existing wires. They require just a pair of pliers to install, and are often used on stereo installations and trailer wiring. A "blade" with 2 notches cuts through the insulation on the wire and makes contact with the conductor. A plastic latch clicks over the blade and holds it in place. These connectors are easy to use and don't damage the wire being "tapped into" much. They aren't good for carrying much current, though, and can loosen up and make a bad connection.
Crimp Connectors
Crimp connectors are made out of a small metal tube with a plastic covering. They come in different sizes for different wire gages. They often are color coded: commonly pink is the smallest, blue the next size up, and yellow the largest. A special pair of pliers is used to crimp the connector onto the wire. Often wire strippers have crimp pliers as part of the handle opposite the stripping end. There are 2 types of crimps for crimp connectors: one uses 2 semi-circular notches to crush the metal tube in the connector into an oval shape. The second and more secure is the "W" style crimp, which actually puts a small dent deep into the tube as well as collapsing it into an oval. Some "high end" crimp connectors have sealable ends to prevent water entry and corrosion. A dab of RTV silicone can be squirted into the connector ends after crimping to prevent water intrusion.
The good and the bad side of crimp connectors
Crimp connectors are for sure better than Scotchlocks or twist and tape. Some manufacturers use crimp connections from the factory, however their crimps are hard to duplicate, especially with the crimp terminals you get at most parts stores. The advantage of a crimp connection over a solder joint is that the solder joint can break just past the solder area if the wire is subject to vibration or movement. In practice I avoid this by reinforcing my solder joints on either side so any flex will be well past the solder joint.
Solder joint with heat shrink tube
This is how I do most all of my electric wire repair.


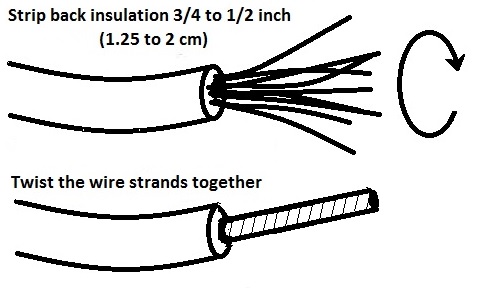
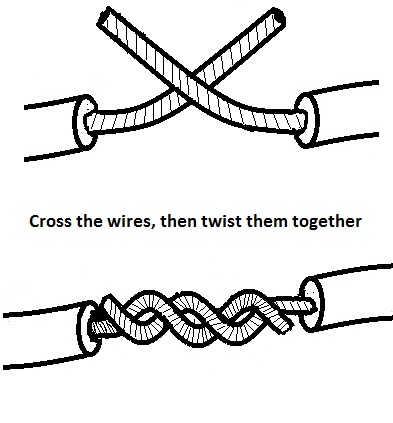
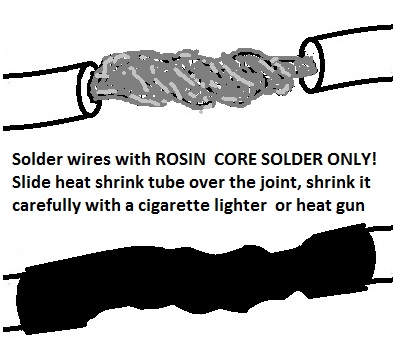
This splice method is the one I normally use. It has several advantages: a solder joint provides a very good electrical circuit, it is resistant to corrosion failure, and is physically very strong. It is important to twist the wires together securely before soldering: the old saying is "You have to make a good mechanical connection before you can make a good solder connection." This finished splice is also close to the same diameter as the original wire, meaning it will fit nicely back in the wiring harness. Many times I'll tape the wires back together in a harness with electric tape, and it's impossible to see where the harness has been repaired.
Make sure to put the heat shrink tube over the wires BEFORE you twist them together and solder them! If you use a Bic lighter to shrink the tube, keep it moving quickly along the length of the tube. It will shrink quickly to the contour of the splice.
Often I'll "double heat shrink" it, putting another slightly larger piece of tube over the first. This stiffens the repair around the solder joint and prevents the wire from breaking from vibration or movement. When you double heat shrink it, it's also easy to squirt a little RTV silicone gasket material under the ends of the tube before you shrink it. This seals the splice making it water resistant.
The Squirrels and Rats Ate My Wires!!!
I've actually repaired several vehicles like that. Those squirrels and rats will go under your hood and gnaw at your wires. I don't know why. When repairing this sort of thing, many are tempted to try to splice the existing wires back together. This is nice if you have some slack, but normally the harness isn't long enough to do a proper splice. If you do manage to splice the existing harness, your splice will be under a lot of tension, since it will be shorter than it was. I normally expose a 6 inch or more section of harness, and do TWO splices per wire, inserting a 3 inch piece of new wire. It's possible to stagger these splices so they don't overlap and make a bulge in the harness. This also minimizes the possibility of a short between the splices, in case the heat shrink tube gets a hole in it or something. With this technique all the wires retain their original length, and when taped together the repair is invisible. (The solder/heat shrink tube method MUST be used for this!)
Repairing Shielded Cables
Some harnesses have shielded cables in them: a co-axial cable, with a wire down the center, and a braided tubular wire surrounding it, acting as a shield preventing electronic interference. These cables usually have low voltage critical signals going down them, so it's important to splice them right when doing a repair.
Splice the center wire first, then cover with heat shrink tube. Take some bare stranded wire, wrap it around the splice area. Solder the new shield patch wire to the shield wire on either side of the splice. cover entire splice(s) with a larger piece of heat shrink tubing.
This splice is a bit larger than the original wire, but it's worth it to be 100% certain your repair doesn't provide an electronic leak! That could cause all sorts of interesting running problems!


