Serving the Gainesville and Hawthorne Florida Area

How Your Car Works: auto system descriptions Get Estimates and Advice by E-mail Think you've been ripped off? Click here for some information that might help Links to other Auto sites and More questions and answers form other readers The Tales of Linda's Lemons Noise Library: got a funny noise? See if it sounds like one of these! Auto articles, tips, and advice Car Killers!!! A list of simple things that can kill your car Car won't start? click here for help!

Alternator Replacement: $125 to $350 Parts and Labor
(Prices good for most domestic or import cars and light trucks)
Return to the Econofix Home Page

Alternator and Generator Repair and Diagnosis

ALTERNATOR TOPICS

What is an alternator
Symptoms of a bad alternator
Proper alternator operation
Alternator Testing with a voltmeter
Temperature Compensated Alternators
A bad way to test an alternator
Voltage regulator tests
Wiring tests
Older Vehicle Regulators
How long can a car run with a bad alternator?
Bypassing the Voltage Regulator on Delcotron 10-SI series Alternators
Alternator Replacement
Alternator Repair and Rebuilding
Alternator Parts and Terms, topics

What is an alternator

What an alternator does is keep your
battery charged. It also provides power to operate your lights and other electric accessories while your car is running.

An alternator is an A/C generator. Cars used to have DC generators, since cars run off DC current. The reason manufacturers went to alternators is that they charge better at low RPM's. An alternator also runs less power through the brushes. A generator needs periodic brush replacement , because its DC output all goes through the brushes. In an alternator a much smaller current is fed through the brushes to the rotating field windings, so they last longer.

The A/C output of the alternator is changed to DC by rectifier diodes in the alternator, so a car alternator really puts out DC power. Some manufacturers have even started calling their "charging devices" generators, even though they are really rectified alternators! (What's in a name? Who cares as long as it charges your battery!)

Symptoms of a Bad Alternator, alternator problems

Symptoms of a bad alternator include hard or slow cranking when you try to start your vehicle, lights that seem too dim, and of course the red BATT, ALT, or GEN light glowing on the dash. (A friend of mine once remarked that she'd never seen an alternator warning light on a car, just a "Battery" light. I told her the battery light was really an alternator trouble light. It means the battery is not being charged.)

NOTE: You can have an alternator problem WITHOUT the "alt", "bat", or "gen" light coming on. The alternator itself is responsible for turning this light on and off (voltage regulator, actually, inside the alternator on most cars), so it can go bad and not turn the light on. If you think you have a bad alternator, diagnose your problems with the alternator testing procedures below.

A Properly functioning Alternator

If your car starts and runs, or if the engine turns over normally when you try to start it but it won't actually run, there is probably nothing wrong with your alternator, starter , or battery.
Your alternator is probably functioning properly.

OVERCHARGING

The only exception is if the alternator is OVERCHARGING: in other words putting out too much voltage. This can "DRIVE THE COMPUTER CRAZY" while the engine is running, and cause all sorts of weird problems.!
An overcharging alternator can "boil a battery dry", so if your battery gets low on electrolyte, making you add water to it, or if you car "eats batteries", you may have an overcharging alternator.

You could completely remove the alternator from the car and your engine would still start and run normally UNTIL THE BATTERY WENT DEAD! Some race cars have just a small battery to fire the spark plugs and no alternator or charging system at all.. An alternator takes away power and weighs a bit, and every bit counts when you're racing! (Top fuel drag racers don't have alternators, or starters for that matter! Just a small battery to power the electric stuff, and a remote starter spins the engine, usually on the supercharger pulley.)

ARE YOU SURE IT'S THE ALTERNATOR?

BAD BATTERY SYMPTOMS AND BAD STARTER SYMPTOMS can be very much like bad alternator symptoms. Make sure it's the alternator before you repair or replace it!
A properly operating alternator cannot charge a bad battery! A new fully charged battery can't spin over a bad starter!

ALTERNATOR TESTING

The best method of testing a bad alternator is with a voltmeter.

TESTING AN ALTERNATOR WITH A VOLTMETER

Put a voltmeter across the battery while the engine is running . Voltage should be 14.2 volts. Lower than 14 volts or higher than 14.4 volts could mean an alternator problem. Turn on the lights and accessories: voltage should stay up around 13 volts. Idle engine up to 2000 RPM. Voltage should go up to 14 or so. (Testing numbers are for 12 volt systems)

IF THE VOLTAGE GOES UP TO 14.2 VOLTS YOU NEED NO ALTERNATOR REPAIR!

NOTE FOR NEWER VEHICLES: temperature compensated alternators

The newer vehicles have alternators which are "temperature compensated". This means they charge at different voltages depending on the temperature. A hot battery requires less voltage to charge than a cold battery, so the temperature compensated alternators charge at a lower voltage when hot than when cold. In any case, note that any voltage reading below 13.5 volts or so is a sure sign of trouble.

A common but dangerous way to test an alternator

THIS IS COMMON, BUT DANGEROUS !!! DON'T DO IT!!!

The old "backwoods" way to test an alternator was to start the car, then disconnect one of the battery terminals and see if the car keeps running. Although this does work, it's not recommended. First, the battery can blow up from a spark near it. On newer cars it can cause a voltage surge which can fry computer components. So even though this way might work, why not just get a $15 voltmeter and do it right?

JUST BECAUSE THE ALTERNATOR ISN'T CHARGING DOESN'T MEAN IT'S BAD.

EXTERNAL VOLTAGE REGULATORS

If you have an older car you might have an external
voltage regulator." Any good repair manual will have instructions on bypassing the regulator to test the alternator.

Alternators regulated by the vehicle computer

Some newer vehicles have the voltage regulator as part of their computer. Chrysler started to do this in the 80's, and some 2000 and up Jeep products have the computer (PCM, or Power Control Module) controlling the alternator. I'm sure there will be more and more of these vehicles in the future. Once again, a manual will show you how to bypass the computer circuit to test the alternator itself.

wiring tests

Even on an internally regulated alternator there can be faults in the wiring and circuits leading to the alternator which can make it not charge. Test the wiring before you replace the alternator! Some vehicles have a fuse which can blow and keep the alternator from charging. Others won't charge if the alternator warning light bulb is burned out! On older Chrysler products (80's), and some newer vehicles of other manufacturers, (2000+) the alternator is controlled by the computer.

The wire from the large terminal (usually labelled "B+") to the battery can have high resistance, usually caused by a bad connection at either the starter or battery "+" terminal. While the car is running, check the voltage both at the back of the alternator (B+) and the positive battery terminal. They should be within a few tenths of a volt of each other. If not, there may be excessive resistance in the circuit. Many vehicles have a fusible link or a large fuse to protect the alternator. These can be burned up by a short or improper use of jumper cables. If there is no power at the alternator B+ (large output terminal) then a bad fusible link or maxi-fuse is probably the problem.


GENERAL WIRING DIAGNOSTIC TEST PROCEDURES


WARNING!!! THE FOLLOWING DIAGNOSTIC TEST PROCEDURES ARE GENERAL FOR INTERNALLY REGULATED ALTERNATORS.. THEY DON'T APPLY TO EVERY ALTERNATOR EVER MADE. THESE TESTS ARE NOT MEANT TO REPLACE DIAGNOSTIC TEST PROCEDURES FROM A MANUAL OR WIRING DIAGRAM DEALING WITH YOUR SPECIFIC CAR OR ALTERNATOR!!!

(Message to legal types: Shoo! Shoo!)

On an internally regulated alternator there are generally 3 terminals. (not including ground: most alternators ground through their cases where they bolt to the engine). The large terminal goes to the battery: it's the 14.2 volt output terminal. Another terminal "turns the alternator on", or provides a sensing voltage for the regulator: it generally gets 12 volts from the "ignition switch on" circuit. The third terminal usually goes to the "alt" or "bat" warning light.

Do these tests before you condemn the alternator and do an unnecessary repair!

On MOST cars, with the ignition switch in the run position, (ENGINE OFF!!! JUST ALL THE DASH LIGHTS LIT UP!!!), good alternator wiring should test like this: The big terminal should have battery voltage (12 volts or so)
One of the small terminals should also have battery voltage (maybe a little less)
The other small terminal should have some voltage (whatever flows through the bulb)

Basically MOST internally regulated alternators should have some positive voltage going to all their terminals with the ignition on. If an internally regulated alternator has those voltages and still doesn't charge then you have a bad alternator.

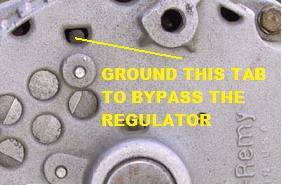
EXTERNAL VOLTAGE REGULATORS AND OLDER VEHICLES

All alternators have a voltage regulator circuit which keeps the voltage at the ideal 13.8 to 14.2 volts needed to run the car and charge the battery. Most newer vehicles have a voltage regulator which is part of the alternator, but older vehicles have the regulator as a separate part. Some Chrysler products used the vehicle computer to operate the alternator. Other manufacturers have recently resurrected this practice of making the voltage regulator part of the computer. On most other older vehicles the regulator was mounted on the inner fender or the firewall. Testing is different for different vehicles and I can't go into all the different tests here, but any good repair manual will have test procedures for making sure the regulator is OK. So if you have a vehicle with a charging problem, and it has an external regulator, make sure to test the regulator before you replace the alternator!

REASON FOR COMPUTER CONTROLLED ALTERNATORS

Here's why automakers make cars with the voltage regulator as part of the vehicle computer: With an internally regulated alternator the voltage may be lower under the dash than under the hood. A lot of computer and electronic stuff lives under the dash, and is very picky about correct voltage. When the vehcle computer controls the voltage, the voltage is very stable under the dash, making the computer and electronic stuff happy.

Disadvantages of Computer Controlled and External regulated Alternators

Computer controlled alternators have their problems. First it's harder to diagnose a bad alternator. If you wire up an internally regulated alternator correctly it WILL work, and if you replace it you know you have fixed your problem testing is fairly easy. With an externally regulated alternator, the alternator is no longer an "integrated charging package", where: "everything charging system" is part of the alternator. Testing is not that hard though. On the old external regulator equipped cars the regulators are fairly inexpensive. Not so with computer controlled alternators! If the regulator goes bad you have to replace the computer. It IS possible to put an external voltage regulator on a vehicle with a bad computer controlled regulator, although this MAY cause some electronic issues. Here's a guy replacing a Jeep Grand Cherokee

How long can a car run with a bad alternator?

Your car can run for a short time with a bad alternator. How long depends on how much electricity your car uses. A car with a mechanical fuel pump can go pretty far. An electronically fuel injected car with electric pump can't go very long at all. No car can make it far at night with the lights on. So if the "BATT, ALT, or GEN" light comes on, no need to immediately pull off the road, but get things checked A.S.A.P.! Also watch your temperature gage! You may have broken a belt, and this could cause your engine to overheat. Should the car overheat, you should stop as soon as safely possible. Either check it out yourself or get it to a mechanic for repair. Special note to air cooled V.W. Beetle owners and Corvairs (Yes, there are still some around!!): the alternator or generator belt turns your cooling fan, so if the light comes on, check the belt very soon: it can severely overheat in a very few minutes!


BYPASSING THE REGULATOR ON AN INTERNALLY REGULATED G.M. DELCOTRON

There is a semi-circular hole in the back of the G.M. Decotron 10-SI internally regulated alternator series. Through this hole you can see a metal tab. This tab connects directly to one of the brushes in the alternator. If you poke a small screwdriver or other suitable probe through this hole and ground this tab, you can bypass the regulator and the alternator will go to maximum output.

WARNING! BYPASSING THE REGULATOR CREATES A VOLTAGE SURGE, SO DON'T REV THE MOTOR FOR THIS TEST, AND ONLY GROUND THE TAB FOR A SECOND OR LESS.
When you ground the tab the motor should idle down as it comes under load, so you shouldn't even have to look at your voltmeter to see if bypassing the regulator made the alternator charge.

It's nice to do this test because there's no good "do it yourself" way to test the regulator with the alternator disassembled.
The downside is that if you weren't careful you could damage electronic stuff. If you're just buying a rebuilt alternator you don't care why it doesn't work and you don't need to do this test.

ALTERNATOR REPLACEMENT

Normally alternator replacement is a good DIY repair project, with the following caution: DISCONNECT THE BATTERY GROUND CABLE!!!

A spark can fry your new alternator, explode your battery, spray battery acid all over you, etc. If there is a fusible link protecting the alternator, it can fry and your new alternator won't work.
On "vee" type belts, don't over-tighten them. You should be able to deflect them an inch or so without a lot of pull.
Flat belts (serpentine or multi-groove) you should just barely able to twist the belt 90 degrees on a long run of the belt.

Most serpentine belts have an automatic belt tensioner. You relieve the pressure either with a wrench on the tensioner pulley nut, or some have a square hole in them for either a 1/2 inch or 3/8 inch ratchet or breaker bar. IN ALL CASES remove the belt, then remove the alternator.


ALTERNATOR REBUILDING and REPAIR

Most of the time the repair for a bad alternator is to remove it from the car and replace it with a new or rebuilt unit from the parts store. If you have pretty good mechanical ability, it is possible to repair some alternators yourself and save some money.

The only alternator I normally will consider rebuilding is the early Delcotron GM alternators (The 10 SI series). They are very modular and no soldering or pressing in of diodes, etc. is required. If you have a good set of sockets you pretty much have what you need to rebuild the early Delcotrons. The diode assembly, brushes and holder, stator, voltage regulator, bearings, and triode are all readily available at parts stores. At one time you could buy a kit with the regulator, triode, brushes, and bearings at Discount Auto Parts for $12. You can still find kits on the web, some in the $20-$30 range. Rectifier diodes are less than $10.

Of course those old Delcotron alternators are available rebuilt with a lifetime warranty for less than $50 at most parts stores.

There are still some reasons you might want to repair your own alternator. I just went through 3 Delcotrons on my old pickup, each from different failures. One had a bearing that started howling, one burned a regulator, the third had a chipped brush from improper assembly and failed immediately. Although they only cost me $39.95 and were cheerfully warrantied, after doing the job 3 times I was pretty mad, and resolved that if the one that finally worked failed again, I'd build the next one myself instead of using my lifetime warranty, just to make sure it gets good parts and gets assembled correctly.

I HATE FIXING THE SAME THING TWICE

I HATE IT MORE WHEN IT'S BECAUSE OF A DEFECTIVE PART


General instructions on rebuilding alternators

These instructions are VERY general unless otherwise stated!
Most alternators are made of two aluminum shells with the stator assembly "sandwiched" in between. The two halves are held in place with bolts, usually 4 of them, facing the rear of the alternator. (terminology: pully side is the front the other side is the rear) . The rear section of the alternator usually houses the brushes, triode, and rectifier diode assembly.

Next mark, or make a note or drawing of the "clock" position of the two halves of the alternator. I usually just take a screwdriver and make a scratch across the side of the alternator. When I put it back together I just line up these scratch marks. This is important because the alternator will bolt back together 4 different ways. If you bolt it back together wrong it would still work, but the wires might not reach, or be in a bad spot, or maybe it wouldn't bolt back on the car at all!

A DELCOTRON TRICK

In a parts store there are 4 different part numbers for Delcotrons that are identical, except they are "clocked" differently! Knowing this trick can come in handy if the store doesn't have the one you need: just buy a differently clocked one, take it apart and "re-clock" it. (Make sure to retain the brushes if you do this: see instructions below in the re-assembly section)

Now remove the 3 or 4 bolts (depending on the alternator) that hold the 2 halves together. You want to let the stator stay with the rear half of the alternator: it is attached to the rectifier diodes in the back half. Tapping lightly with a CAREFUL!!! hammer around the circumference of the alternator where the two halves meet will help separate the halves if they are "sticky".

FRONT BEARING REPLACEMENT

To rebuild an alternator properly you should replace the front bearing. This is usually not the reason you have the alternator off the car, though. If you have low miles on the alternator, or if the bearing is expensive or hard to get, you could skip replacement if the bearing seems tight and spins quietly.

Removing the large nut on the front half is easy if you have an air impact wrench, somewhat harder otherwise. Most of the time you can jam the cooling fins on the front with a large screwdriver and break the nut free with a regular ratchet and socket. Be careful not to bend the fins or damage the aluminum housing.

The front bearing is pressed in: sometimes there is a bearing retainer plate with 3 screws holding the bearing in. Remove the retainer if there is one, and press the bearing out. If you don't have a press you can usually use a hammer and punch to remove the bearing. A large socket (or the old bearing!) make great bearing installation tools. Just make sure to tap gently and evenly around the OUTER RACE ONLY on the new bearing when putting it into the housing. Tapping on the inner race can damage the new bearing.

Next, remove the stator from the rear half of the alternator. The 3 output wires of the stator bolt to the rectifier assembly on Delcotrons and several other alternators. On some other alternators the 3 wires are soldered to terminals or a circuit board.

Next remove the brushes, voltage regulator (if it's an internally regulated alternator: most are nowadays), regulator diodes (the triode on Delcotrons and some others), and the rectifier diodes.

On some alternators the rectifier diodes are pressed into the rear half of the alternator frame.

Often there is a circuit board that has the components soldered to it.


REPAIR AND TESTING AFTER DISASSEMBLY

After disassembly, testing is done with an ohmmeter. Hopefully you will find a repair part that is available and cheap!
Using an ohmmeter, test the diodes, both regulator diodes (triode in Delcotron) and rectifier diodes. A diode is a "one way valve" for electricity, so each diode should show some resistance reading on the meter one way, and no reading, or infinite resistance the other way. A bad diode will either have infinite resistance both ways, or will conduct some current (show a reading on the meter) both ways. Delcotron note: there is a rectifier diode assembly with both positive and negative diodes in it. Strips of metal with u-shaped slots go over the electrical contact studs on the rectifier assembly. To isolate the diodes bend these strips away to each side enough to isolate them from each other.

Put the ohmmeter on the two slip rings on the alternator shaft (where the brushes contact).
There should be almost no resistance. Put one lead on the slip ring and one on the alternator shaft. There should be infinite resistance.

Test between all three leads of the stator in turn. Resistance should be the same for each lead. Test between one stator lead and the steel stator shell. Resistance should be infinite. Look for heat damage to the copper windings on the stator and rotor. If they aren't nice and "copper colored" then you might have a problem.


SO... HAVE YOU FIXED ANYTHING YET?

Found anything yet? Hopefully in your tests you discovered a bad diode. They're usually cheap and are fixed easily. In that case you can replace the diode and feel pretty confident it will work when you put it back together. If nothing tests bad, then it's likely that your voltage regulator is bad. Unfortunately there is no good way to test the regulator when the alternator is disassembled.

Really the only other parts that could be bad would be the rotor and stator. These can fool your ohmmeter test, because the resistance between the 3 wires of the stator and the 2 slip rings on the rotor is very close to zero. There could be a short between coils, and the reading would also be zero. If everything tests good and you are confident in your "bad alternator" diagnosis, you might want to dump all the parts back inside and bolt the thing back together, then go to the parts house and get a rebuilt. If the rotor and stator look good, and the regulator is fairly cheap, you can try replacing the regulator and hopefully that will fix it. On old Delcotrons the regulators were cheap and were a normal part of a rebuild.

Before reassembling the alternator you should replace or service the rear bearing. On the old Delcotrons the rear bearing was a roller type that almost never went bad: you'd just stick your little finger in grease, shove it in the back bearing, and put the thing back together. The newer Delcotrons have a tiny sealed ball bearing in the rear. It's a piece of junk, and often this bearing is the reason for going into a newer Delcotron. If you're building one of these, for sure replace the rear bearing.

Other alternators have other bearing setups. The back bearing doesn't have as much load as the front (no belt tension on the back) but still.... if you don't replace it......

As they say in the manuals, reverse procedure to re-assemble!

Put in new brushes , and polish the slip rings with some very fine sandpaper. Look at the brush holder. It will have two tiny holes in it, facing the rear of the alternator. Get a "stick" to hold the brushes in. Some good "sticks": a toothpick, a straightened out paper clip, or the nozzle extender for a spray can, like the one they tape to the side of a can of WD-40. Push the brushes down against their springs, and insert your "stick" through the holes in the brush holder to keep them down inside the brush holder. Another paper clip or coat hanger wire bent into an "L" shape can help push the brushes down in the brush holder far enough to put in the "retainer stick".

Some alternators have a heat conducting grease under the rectifier diodes and/or voltage regulator. It's usually a white-ish colored film on the back of the component. A small tube should come with the replacement part. If you're not replacing that part, the heat conducting grease is available at parts stores.

After installing all the stuff in the back of the alternator, carefully slide the 2 halves together, making sure you get it "clocked right". Bolt it together, then pull out your "stick" to release the brushes. Put it on the car and you should be good to go!

Here's a link to a guy's youtube video of rebuilding an alternator:
He has some other alternator repair videos on there too.


ALTERNATOR PARTS AND TERMS

Here's a list of common alternator parts and terms
BRUSHES: Made of graphite they contact the two slip rings, energizing the field coil of the alternator. They are tensioned against the slip rings by springs. Held by a "brush holder", they are usually in the rear of the alternator.

SLIP RINGS: These are two circles of copper attached to the shaft of the rotor. Wires connect them to either end of the rotor field coil.

ROTOR: The rotor assembly includes multiple "pole shoes", copper field windings, and the slip rings, all mounted on the central shaft of the alternator. Multiple "N" and "S" poles on the rotor pass across the multiple sets of stator windings (in groups of 3) to make 3 phase AC current.

STATOR: It fits between the two halves of the alternator with the rotor spinning in the center of it. The stator has multiple poles wound with copper wire. The poles are in groups of three, providing 3 phase current.

DIODE: A "one way valve" for electricity. Diodes have low resistance in one direction, and infinite resistance in the other. RECTIFIER DIODES: 6 are used (3 positive, 3 negative) to convert the 3 phase AC output of the stator to DC

REGULATOR DIODES/ ADDITIONAL DIODES Some alternators have additional diodes duplicating the rectifier diodes, but they have a very small load on them. Some voltage regulators uses this as a reference to regulate the alternator output. Often the brushes (and the rotor field) are powered through a separate set of diodes.

Delco alternators have such a set of diodes, called a TRIODE ASSEMBLY: it's 3 diodes in one

VOLTAGE REGULATOR: supplies current to the rotor field coil via the brushes and slip rings. It varies this current to control the alternator output. Most auto alternators today have the regulator inside them, called "internally regulated". Older vehicles had an external regulator, often mounted on the fender or firewall. Some automobiles use the vehicle computer to control the alternator.

What to learn more? Check out Joe Guilbeau's Alternator Theory Page
He goes into GREAT detail on repair of Delcotron alternators, plus detailed description of alternator theory of operation. .


Auto, Car, and Truck Article List

A
ABS: Anti-Lock Brake Systems
ADVANCE: Car ignition timing
ALTERNATORS and Car Battery
AUTOMATIC TRANSMISSIONS
B
BAD CAR DESIGNS
Bad Drivers: How NOT to drive
BATTERIES: Auto, Car or Truck
BELTS AND HOSES
BEARINGS
BODY AND BUMPER REPAIRS
BRAKE REPAIRS: Car or Truck
C
Car Washing and Care
CARBURETORS:Car & Truck
CHECK ENGINE LIGHT
CLEANING: Engine Cleaning
CLUTCH REPAIRS: Car & Truck
COIL (IGNITION)
COMPRESSION: Car Engine
COMPUTER CAR CONTROLS
CV JOINT OR CV AXLES
D
DISTRIBUTORS (IGNITION)
E
ELECTRIC WIRING REPAIR
ENGINES: Car & Truck
ENGINE CLEANING
EXPANSION PLUGS
F
FILTERS: OIL, AIR, ETC.
FREEZE PLUGS
FUEL AIR MIXTURE
FUEL INJECTION: Car & Truck
FUEL PUMPS: Car & Truck
G
GAGES AND "IDIOT LIGHTS"
GASKETS AND SEALS
GLASS: WINDOWS AND WINDSHIELDS
H
HEADS & HEAD GASKET
HOSES AND BELTS
I
"IDIOT LIGHTS" AND GAGES
IGNITION COIL
IGNITION TIMING: Car & Truck
J
AUTO JACKS: lifting cars safely
K
L
LEAN "Car runs lean"
LIGHTS: WARNING OR "IDIOT LIGHTS"
Limp Home Mode
M
MIL Light
MANUAL TRANSMISSIONS
N
NO START: Car Won't Start
O
OIL CHANGES
OIL: What's right for your car?
OIL LIGHT ON OR GAGE LOW
P
PCV Valve
Q
R
RADIATORS: Car and Truck
RICH: Car runs rich
S
SEALS AND GASKETS
SERVICE ENGINE SOON LIGHT
SPARK PLUGS
STARTERS: Auto, Truck
T
THERMOSTATS
TIMING: IGNITION TIMING
TIMING BELT & TIMING CHAIN
TIRE REPAIR
TRANSMISSIONS: AUTOMATIC
TRANSMISSIONS: MANUAL
U
V
VACUUM ADVANCE
WARNING LIGHTS OR "IDIOT LIGHTS"
Car Washing and Care
W
WATER PUMP REPAIR
WINDOWS AND WINDSHIELDS
WIRING REPAIR
X
Y
Z

only search Econofix.com


RETURN TO THE ECONOMECHANIX HOME PAGE

Thank you for visiting the ECONOMECHANIX WEB SITE. Please feel free to comment.


>> CLICK HERE: The Econofix Cyber Mall!!! >

The Economechanix Cyber Mall